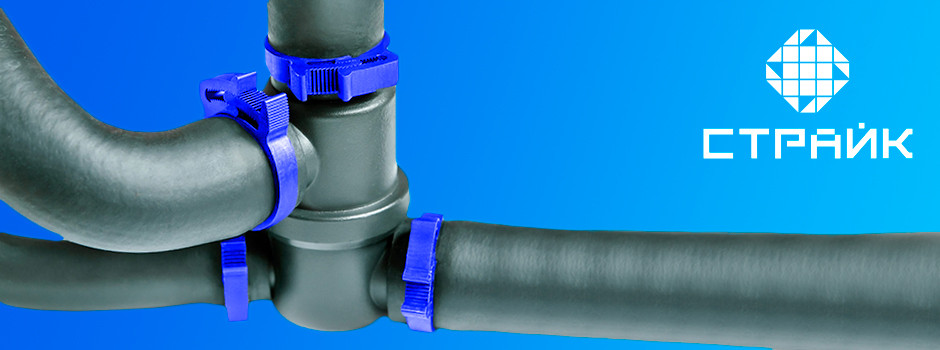
 The plastic power clamp is designed to connect round-shaped elements (Clip-Track, Clip-Track). Thanks to this design, it is possible to quickly and easily install the clamp on round-shaped elements: hoses, pipes, nozzles, fittings. The design of the Clip-Track® locking device ensures durability and reliability due to its unique double row of teeth in the locking lock. A double row of teeth allows you to create the greatest clamping force, compared with similar products with a single-row lock device.
Additional protrusions-stops located on the upper surfaces of the parts of the locking mechanism help to disconnect the clamp without using a special additional tool, make the clamp universal and reusable for use. When the clamp lock is closed to the maximum, a screwdriver tool may be needed to disconnect it in order to shift the central toothed rod in relation to the toothed groove to the side.
Material
The plastic power clamp for connecting round-shaped elements (Clip-Track, Clip-Track) is made in different sizes and from different types of plastic.
PA 66 (Polyamide 66)
The maximum long-term exposure temperature is 132℃, the peak temperature is 170℃.
This material has proven its mechanical strength, rigidity and thermal stability.This material becomes harder at low temperatures, has high frictional properties, is indispensable in almost all areas for the production of a wide range of components and machine parts, as well as as high-quality electrical insulation materials and many special applications. Used where electrical applications require 600 V or less, and frequencies of 400 Hz or lower.
PP (Polypropylene)
The maximum long-term exposure temperature is 60℃, the peak temperature is 90℃.
The plastic power clamp for connecting round-shaped elements (Clip-Track, Clip-Track) is made in the followingcolor version:
- Blue – The clamp is made of PP, (polypropylene) for use in gentle operating conditions at temperatures not exceeding 90 ℃. (for domestic use)
- Black – The clamp is made of PA66 (polyamide), PA66+30% glass-filled, for use at long-term exposure temperatures of 132 ℃ and above, maximum peak 170℃ (check with the manufacturer).
*The manufacturer reserves the right to change the color of the product, without prior notice to the buyer, but in compliance with all technical characteristics and requirements for manufacturing materials.
Pressure
 The sealing quality during compression with a Clip-Track clamp and pressure measurement for a braided reinforced PVC hose with a fitting is capable of sealing from 24 to 30 bar.
*The value may differ from the specified one up or down, depending on the hose and fitting.
*PA 66 (Polyamide 66) is a more durable material than PP (polypropylene) It is recommended to use at least 3 teeth, choosing the correct size of the clamp.
Features
- It does not corrode!
- A double row of teeth allows you to create the greatest clamping force, compared with similar products with a single-row lock device.
- The possibility of reusable use (up to 100 times or more, with the right choice of clamping force).
- The possibility of a connector without using an additional tool (when the lock is closed by half).
- Quick installation, disassembly. Installation without depressurization of the system.
- It is resistant to stress cracking.
- It is resistant to bends and kinks.
- Resistant to chemicals, salts and alkalis, paints and solvents.
- Resistant to UV radiation.
- Resistant to vibration.
- Oil-and-gasoline resistant.
- It is not magnetic.
- Temperature resistant (up to 170℃).
- Frost-resistant (-100℃ and below).
- Minimum installation temperature (-40 ℃).
- Electrical insulation resistant (used up to 600 volts and 400 Hz).
Application
- Automotive industry;
- Household pipe systems and appliances;
- Irrigation systems (Garden-Vegetable garden);
- Hydro massage systems;
- Agricultural machinery;
- Medical equipment;
- Pharmaceutical production;
- Industry;
- Vending machines.
Installation
To install the clamp correctly, you must first
- Determine the diameter of the pipe or hose by measuring it with a measuring instrument.
- Select the size of the clamp according to the measurement (the size of the clamp is indicated as a two-digit number and applied to the clamp. (a properly selected clamp with a lock fastened on 1 tooth will be equal to the measurement of your pipe or hose, or may be 1-2 mm larger).
Installation
- Remove the clamp from the plastic and cardboard packaging;
- Put on the clamp by threading it onto the hose or nozzle that needs to be fixed on the fitting. This product can be installed on a hose or branch pipe, after spreading the ends of the clamp in different directions with your hands;
- Put the hose or nozzle on the fitting or tube of the appropriate size;
- Install the clamp by pushing it along the hose or branch pipe away from the edge of at least 5 - 9 mm;
- Fix the clamp on the hose or branch pipe, orienting the pre-locking device of the clamp so that it is convenient to open it in the future, and it does not interfere with any external factors by pressing on its edges, which have a ribbed surface, with your fingers hands until the moment when the efforts of the fingers will be at the limit. You will hear the clicks of the locking mechanism, which characterizes its operation and compression with a hose clamp or branch pipe; Do not try to put on and snap a smaller clamp onto a pipe or hose of a larger diameter of the clamp you have chosen, trying to squeeze and compress it with sliding pliers.
- Take adjustable pliers, (sliding pliers) and compress the clamp using this tool, (gripping only the ribbed edges of the clamp) until you see that the hose or nozzle is compressed securely, the stem of the locking mechanism does not move further. Be careful! Further uncontrolled compression of the clamp may subsequently lead to failure of the locking mechanism.
- Make sure that the hose or branch pipe is securely attached to the fitting or pipe-tube, by hand-twisting the hose or branch pipe, as well as by applying liquid pressure to the circuit where the connection was made; (if necessary, try to compress the clamp with a tool for another 1 tooth)
- Dispose of plastic and cardboard packaging in a container designed to collect this type of packaging.
*the upper part of the locking mechanism is slightly compressed to its lower part to create tension and better clamping to the central stem of the locking mechanism.
*ATTENTION! The clamp is not compressed when exposed to additional upper protrusions-stops (one of which does not have a ribbed surface) located on the upper surfaces of the parts of the locking mechanism, presented in the form of a rounded triangle from one edge. They only serve for additional assistance when opening!
Dismantling
Using the helper key
 Take universal plastic key (manufactured by the STRIKE company, the large groove in which is designed for clamps 9 mm wide, and the smaller groove for clamps 7 mm wide, the key is double-sided, symmetrical) and insert it into the clamp lock from the side groove of the clamp (“mother”), orienting it in such a way that the ribbed wall of the working part of the key falls in the middle of the clamp lock rod. By turning the key to the left or to the right (whichever direction is more convenient or space allows), we squeeze the toothed rod out of the toothed groove of the clamp lock until it is completely released, the clamp opens and it can be removed by bending the edges of the clamp lock to the sides and reused on other products.
Attention! Correctly orient the working part of the key to the clamp lock rod. If the orientation is incorrect, you can press not on the rod, but on the edge of the clamp lock, which will break the working surface of the key and the clamp lock will remain closed.
Using your fingers
Place your thumb and index finger on the additional protrusions located on the upper surfaces of the locking mechanism parts, presented in the form of a triangle rounded at one edge. Press the stops with your fingers, moving them in opposite directions from each other, so that the teeth of the locking mechanism rod move in the opposite direction from the teeth of the upper and lower row of the locking mechanism groove by the width of the rod. The locking mechanism will open, after which the clamp can be removed and reused on other hoses and pipes suitable for the given size.
Attention! You can use your fingers to open the clamp if you do not compress the locking mechanism of the clamp too much.
Using pliers, a screwdriver and any flat object
When the locking mechanism (lock) of the clamp is closed to the maximum, to disconnect it, you can also use a tool in the form of a screwdriver or sliding pliers to move the central gear rod or gear groove to the side in relation to each other. Grab the side surfaces of the clamp with pliers from the groove of the locking mechanism and move them by turning the pliers to the left or to the right, which is more convenient, until the rod comes out of the groove of the locking mechanism of the clamp. The locking mechanism of the clamp lock will open.
You can also insert any flat object into the additional protrusions-stops located on the upper surfaces of the parts of the locking mechanism, presented in the form of a triangle rounded at one edge, and turn it to the side at a kink, which will lead to the locking lock moving to the sides and unlocking will occur. clamp.